GMC Acadia Forum banner
21 - 40 of 54 Posts
Discussion starter · #21 ·
Hi.

I also did not want to mess with compressing the struts.
These ready mounts seem to be doing a good job.
I did keep the OEM struts/coils in case something didnt work out.... I could compress and reused on a new set of AC DELCO struts.

But so far so good.
11,500 miles on the new ones.
 
I just replaced my original struts on my 2009 Acadia with the Gabriel Ready Struts, as well.

Decent price from Rockauto.com. O'Reilly's was about $100 more per strut.

I replaced the links at the same time, as well. 95% improvement on noise from the front.

Pretty simple swap for the DIY crowd. Not having to deal with spring compressors is very, very nice, as well.

Tom
 
Soooo....I attempted to replace my struts and end links today but had to abort because the end links were so corroded I couldn't get the nuts to come off - even after heating with my bolt buster tool. Stripped the end of the bolt where you place the 8mm socket to hold the bolt steady so all I achieved was endless spinning. :eek:

Due to time constraints I had to abort the repair and put everything back together. I'm going to regroup either use a power tool or a hack saw (not sure if I can fit either in such a tight space) to cut the links off since I was already planning to replace them. I'll also need to buy some bolts for the end links since any I'm forced to cut will still be a PITA to remove.

Anyone else hacked these off? If so curious what tool you used / would recommend.
 
A Sawzall with a metal cutting blade would work well for that.
I had trouble with mine, but worked the nut back and forth and finally got it off without any cutting. The trick is too work it back and forth and by cleaning the threads with a steel brush. PB Blaster works good too.
 
Outlook Guy said:
...
Anyone else hacked these off? If so curious what tool you used / would recommend.
Why don't you try a nut splitter? Easy to fit in tight spaces. No flying debris. Zero chance of damaging anything nearby (unless you're a klutz :) ).
 
Discussion starter · #29 ·
we once had to remove a rusted on bolt/nut-
we just said screw it....

grabbed my cuttoff wheel thingy--- and in about a minute-doink..... ground right thru it......

lots of sparks.. but got it done.
 
rbarrios said:
we once had to remove a rusted on bolt/nut-
we just said screw it....

grabbed my cuttoff wheel thingy--- and in about a minute-doink..... ground right thru it......

lots of sparks.. but got it done.
Yea, I have better luck with those, easier than holding on to a sawzall, seems quicker too.
 
Did my struts this weekend, after reading this and watching the 1A Auto youtube video, and it really helped, so wanted to give back.

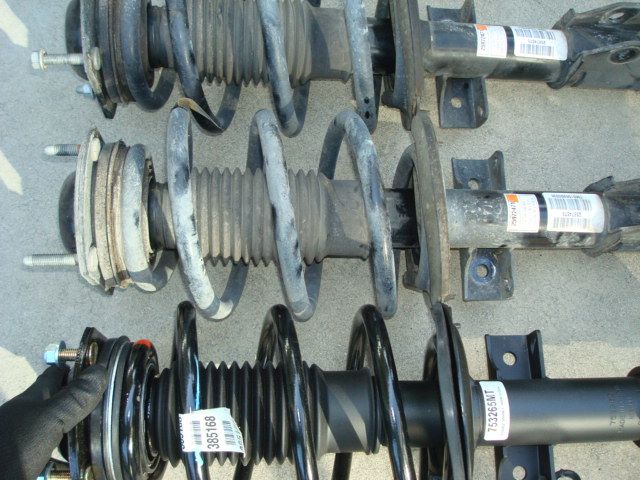
I went with the Gabriel G57109 suspension strut assembly, currently $149 on Amazon and elsewhere. Go with the pre-loaded struts, and don't screw around with compressing the old spring and trying to get it to seat right in the top of the assembly, all while trying not to go blind when the thing decides to decompress on one side. You are already saving the money by doing the job yourself, so just get all new parts.

Since I was disconnecting the stabilizer arm connecting rod from the strut assembly, and there was exactly one more bolt holding the whole rod in, and the new ones cost $28/each, and the ACDelco ones had zerk fittings for grease, and I was already doing the alignment after this, I replaced those as well. ACDelco 45G20659.

First, let me say that the end result was way more satisfying than the average maintenance job that I've done. I change the brake fluid and power steering fluid because it's time, but you don't get the immediate satisfaction of not bottoming out and having that long up-down after a bump, like with this job. Old springs and struts just sneak up on you, so that at 65K, I just got used to a poor ride, and wish I had done this sooner.

So, on to the actual job. After you have the front end in the air, with both wheels off, hit the connecting rod nuts with a generous amount of PB Blaster. These will be the hardest nuts to remove, and the PB really helps.

Next, my 2012 has a rounded bottom to the windshield wiper arm mount, so that the puller didn't really work, as there was no good lip to attach the arms to. However, and this is what I was hoping for, you can just remove the few plastic clips that hold the cowl cover on, and then put a roll of paper towels, or similar, under the plastic, and have easy access to the three bolts at the top of the strut mount. There is a grill directly above the three bolts, and you will wonder why GM didn't put plastic clips on it, so that you could just access those bolts, but that's another rant. Remember to torque those bolts to 45 ft/lbs, after the wheels are back on the ground. Just snug them up before you lower the car.

After the job was done, and the car felt like new again, I noticed a rubbing/squeaking sound. A found a TSB that mentions that the top of the piston should be greased, and this is a known issue, particularly in cold weather. I grabbed a little synthetic brake grease and rubbed it around the very top of the piston, without having to remove the wheel, and today it was totally quiet. So, do this before you put the wheel back on, while you're in there.

You have to get an alignment after this, as with most other suspension work. I had purchased the lifetime alignment from Firestone, which was strategically priced at about twice the cost of a single alignment, and I was a little concerned about telling them that I had just put in new suspension parts, but it didn't impact the warranty. The alignment was only off slightly, and I couldn't feel it pull at all, but the toe was out -0.22 degrees on the left and -0.19 on the right. Don't think I would have ever known that without the alignment, but I've got new tires, so no sense wearing them out prematurely.

If you feel a bump long after you have passed it, or you are bottoming out more than you used to, do this job and you'll remember what the Traverse felt like when it was new.
 
So I got around to this job again today. Was able to get the passenger side done before running out of time - I still ended up spending a lot of time dealing with that stupid nut that holds on the end link.

I had purchased a cut off wheel for my drill to take care of the corroded nut but when I went to use it I found there really wasn't any way to get the cutting wheel in there at the right angle. So I ended up using a hacksaw (still a tight space to maneuver) and with a lot of time and effort cut it off.

Some other advice I'll impart for folks attempting this repair:

You'll need a lot of leverage to loosen the two 24mm nuts holding the knuckle to the strut - make sure you have a pipe or some other extension handy that you can slip over your breaker bar. (You can see one in rbarrios's pictures) I was desperate and had to get creative - used part of the handle from my craftsman floor jack and slipped it over my breaker bar. :D

I'd also have a small sledge hammer available to pound out the bolts once the 24mm nuts are loose. You don't have much space for swinging so you need all the ooomph you can get to hit the bolt. I'm guessing it took a lot longer for myself using a regular hammer. I'd also recommend you use hearing protection for this step - my ears were ringing as I started hammering on the bolts so I went and put some ear protection on.

Not happy about only finishing half the job but at least now I have a new strut and end link on one side and it feels solid.
 
I think the key here if you are going to attempt this yourself or with a helper, you need to use an impact wrench. Makes working on your own vehicle much easier. Not trying to downplay your effort, just trying to help make things better if you're trying to do it yourself.
 
Discussion starter · #34 ·
It also helps-- if the vehicle is rust free...
you can see that after 100,000--- my bolts/nuts are clean
 
rbarrios said:
It also helps-- if the vehicle is rust free...
you can see that after 100,000--- my bolts/nuts are clean
I agree. It's amazing no matter how well I take care of my vehicles, they still get rusty in WI. The only thing you can do is not drive them in the winter, but that's not practical for most.
 
A Cordless impact wrench is a great thing.

I bought a used Milwaukee on ebay, and it's much, much easier to get those big nuts and bolts off. Zip, Zip and you are done.

The lone drawback is its size, as a smaller tool can get into more spaces. Other than than, very, very pleased with the purchase.

Tom
 
Anyone else have feedback on these ready mount struts from Gabriel? My 07 Outlook w/140K has leaking RF strut so I was just going to go with the Monroe OE Spectrum Premium struts from Amazon for $95 per but with those kind of miles and I'm thinking just go with all new ready mounts. TIA.
 
Discussion starter · #40 ·
I replaced my rears at 87,000 miles (5.5 yrs old) with AC DELCOs. (right before I made a trip where I was loaded with cargo).

pics here- and a video of the originals vs new- where I compressed them.

http://www.acadiaforum.net/index.php?topic=25610.0
 
21 - 40 of 54 Posts